Understand permissions for each User type, how to create a team, and manage each User account
Table of Contents
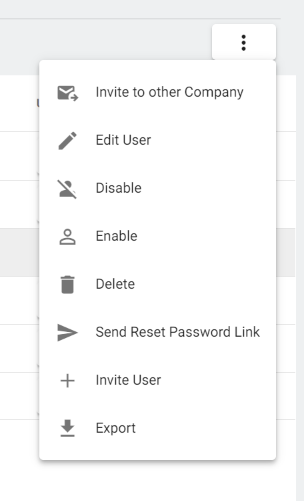
Invite Users
When you first enter the application, you'll only see the Owner's account (the first User added to the platform ususally). To add additional Users to the platform, click the User menu to the right, and then click "Invite User".
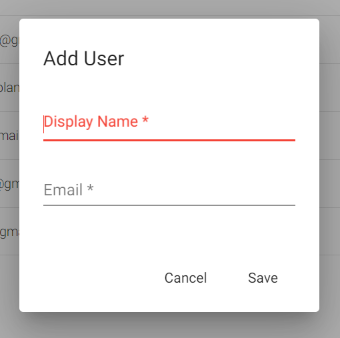
When you invite a new User, you'll need to include two pieces of information.
First, how you'll recognize them when they're assigned to Events in the grow (usually their name).
Second, their email, so they can receive an invite to make a password for their own account.
After a User is created, they can access the Web app at app.planacan.io.
Inviting Users to Other Grow
If you have multiple licenses associated with your account, you can also invite an existing User to another account. This will send them an invitation, and add a status of "invitation sent", if they haven't completed the process.
This is very helpful for MSO's, or grows that segment their work between multiple Calendars.
User permissions
There are three levels of accounts in PlanaCan - Owner, Manager, and Standard User. Each type of account has different permissions for what they can, and can't do in the application:
- Owner - has access to everything in the application. This includes Grow Settings, and Company settings. This includes changing name, time zone, and payment. Importantly, they have permission for grow settings to set up Zones, and Strains.
- Manager - Has access to all scheduling functionality. Does not have permissions for Grow Settings.
- Standard User - Has no access to scheduling functionality. They cannot change Templates, or schedule new events on the Calendar. Standard Users can only receive information, and fill out Event information when completing them.
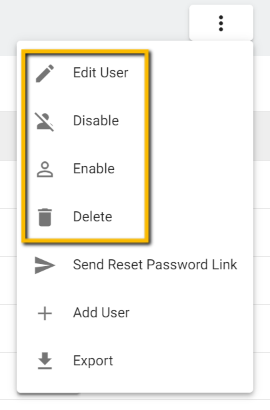
Updating, editing, disabling, and deleting Users
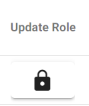
To update a User's permissions, click the lock icon to the right of the User's name, and change their role.
It's important to note that you can't update another User's role to any role with more permissions than your own level.
You can also edit Users. You can change the User name, and also the email they use. If you change their email, be sure to resend a password so they can update their login!
Disabling a User is different than deleting them. It locks them out of the application, but doesn't get rid of their information in case you'd like to reactivate them.
Deleting a User is just like it sounds - if you have a grower that no longer works at the cultivation, you can remove their data from the software. They'll lose all access to any information in the application.
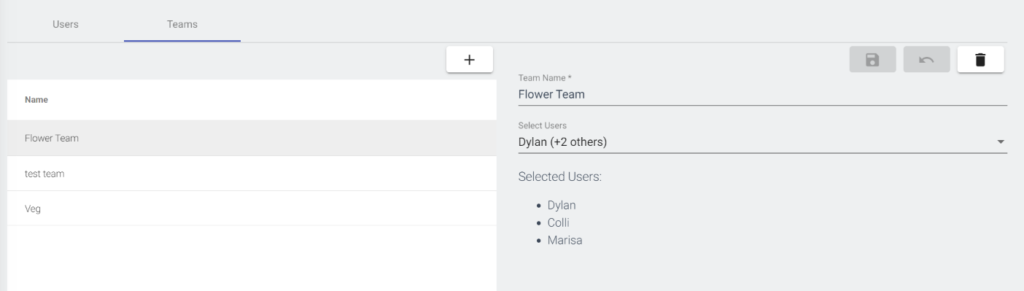
Teams
Teams are groups of Users you'd like to group together to do the same Events. They are used in conjunction with the Mass Assign functionality.
An example of a Team might be a Veg Team - they handle all of the Events associated with the Veg Phase of plant growth.
For more on Teams, and their uses when assigning tasks, click here.