Curing is a critical step in both food preservation and cannabis cultivation, where quality, safety, and shelf life all depend on getting it right. A recent Cornell study found that hot air drying followed by glass jar curing reduced moisture to 6% in just 8 hours and cut yeast and mold counts by 99%. This is one of the most effective methods for microbial safety and cannabinoid retention.
We understand how challenging it can be to manage this delicate process at scale, where even minor inconsistencies can lead to spoilage or lost potency. In this blog, we explore how curing works, compare methods across food and cannabis, and share strategies for staying consistent, especially in commercial grow operations.
TL;DR
- Curing methods in cannabis involve controlled drying and aging processes that enhance potency, preserve terpenes, and prevent mold for a smoother, higher-quality product.
- In cannabis food preservation, techniques such as vacuum sealing and humidity control maintain the freshness of edibles, prevent spoilage, and allow for a longer shelf life.
- Knowing these methods helps growers avoid costly mistakes and deliver consistent, premium harvests.
- Key curing techniques include jar curing, room curing, and automated systems tailored for different scales of operation.
- Factors like temperature, humidity, airflow, and handling practices significantly impact the success of the curing process.
What is Curing?
Curing is a controlled process of drying and aging used to preserve and enhance products like food and cannabis. It manages moisture levels and promotes chemical changes that improve quality, safety, and shelf life.
- In Food: Removes excess moisture, inhibits microbial growth, and develops complex flavors in meats, cheeses, and fermented goods.
- In Cannabis: Allows chlorophyll breakdown, stabilizes cannabinoids, and enhances aroma and potency while preventing mold.
- Key Elements: Temperature, humidity, and airflow are tightly managed to avoid spoilage and retain desired qualities.
Although curing is important across various industries, it is crucial in cannabis cultivation for ensuring high-quality buds that satisfy consumer demands for flavor, potency, and shelf life. Let us look closely at why this step matters so much in the following section.
Why is it Important to Cure Cannabis Buds?
Curing is not just a finishing touch. It is a critical step that determines the final quality and marketability of your cannabis. When done right, curing can enhance product value and ensure consistency across harvests.
- Improves Potency: Allows cannabinoids like THC to stabilize and mature for stronger effects.
- Enhances Flavor and Aroma: Breaks down chlorophyll and preserves delicate terpenes, resulting in smoother, richer profiles.
- Prevents Mold and Spoilage: Controls residual moisture that can lead to microbial growth during storage.
- Extends Shelf Life: Properly cured buds maintain their quality longer, reducing waste and returns.
- Increases Consumer Appeal: Higher-quality appearance, aroma, and smoke experience create repeat demand.
To achieve these results, it is essential to understand how curing works step by step. Let us break down the stages and what happens during each phase.
Stages of the Curing Process
Curing cannabis is a multi-stage process where each phase plays a specific role in improving the bud’s quality, aroma, and shelf life. From initial drying to long-term storage, understanding these stages helps growers maintain consistency across harvests.
Stage 1 – Initial Drying Phase
This is the first step, where freshly harvested buds lose surface moisture to prevent mold and prepare for curing. Proper airflow and environmental control are crucial in this situation.
- Hang plants or branches upside down in a dark, ventilated room.
- Maintain temperatures between 60–70°F and humidity levels of 45–55%.
- Drying typically takes 5–10 days, depending on bud size and density.
Stage 2 – Controlled Curing Phase
Once dried, buds undergo a slow aging process that allows internal moisture to redistribute evenly and enables chemical changes to occur.
- Transfer the buds into airtight containers, such as glass jars.
- Store in a cool, dark place at a relative humidity of 60–65%.
- “Burp” containers (open briefly) daily for the first 1–2 weeks to release moisture and gases.
- This phase typically lasts 2–8 weeks to achieve optimal flavor and potency.
Stage 3 – Storage and Maturation
Well-cured buds can be stored for months without degrading if conditions remain stable. However, you need to be careful of the following:
- Use airtight containers with humidity packs to maintain 58–62% RH.
- Keep storage areas cool and away from light to prevent cannabinoid breakdown.
- Monitor periodically for mold or dryness.
Managing these stages consistently at scale requires the right tools and environmental controls. Next, let us explore the equipment that supports precise drying and curing workflows for commercial growers.
Tools and Equipment for Drying and Curing
Consistent drying and curing results depend on more than just technique—they require the right equipment to control temperature, humidity, and airflow. For commercial growers, scaling these processes across multiple rooms or harvests means precision tools are essential.
Table describing the tools and equipment required:
Tool/Equipment
Description
Drying Racks or Nets
Space-efficient systems for drying trimmed buds with good airflow, ideal for smaller facilities.
Climate-Controlled Rooms
Large-scale drying environments with automated temperature and humidity control for consistent results.
Hygrometers and Thermometers
Monitor environmental conditions to prevent mold or overdrying during both drying and curing stages.
Glass Curing Jars
Airtight containers are used for small- to mid-sized operations to cure buds in controlled conditions.
Humidity Packs
Regulate moisture levels within curing jars or storage containers to maintain 58–62% RH.
Automated Curing Chambers
Advanced systems that handle large batches with built-in monitoring and air exchange.
Coordinating tools, tasks, and timelines across multiple grow rooms can get complicated fast. PlanaCan’s scheduling and tracking tools help you keep everything organized so your curing process stays on track from start to finish.
In the next section, we will explain the different types of curing methods in the marijuana industry.
Curing Methods in Cannabis Cultivation
The way you cure cannabis directly affects its potency, aroma, and shelf life. Different methods suit different scales of operation, from small setups to large commercial facilities. Here are the most common approaches, along with their advantages.
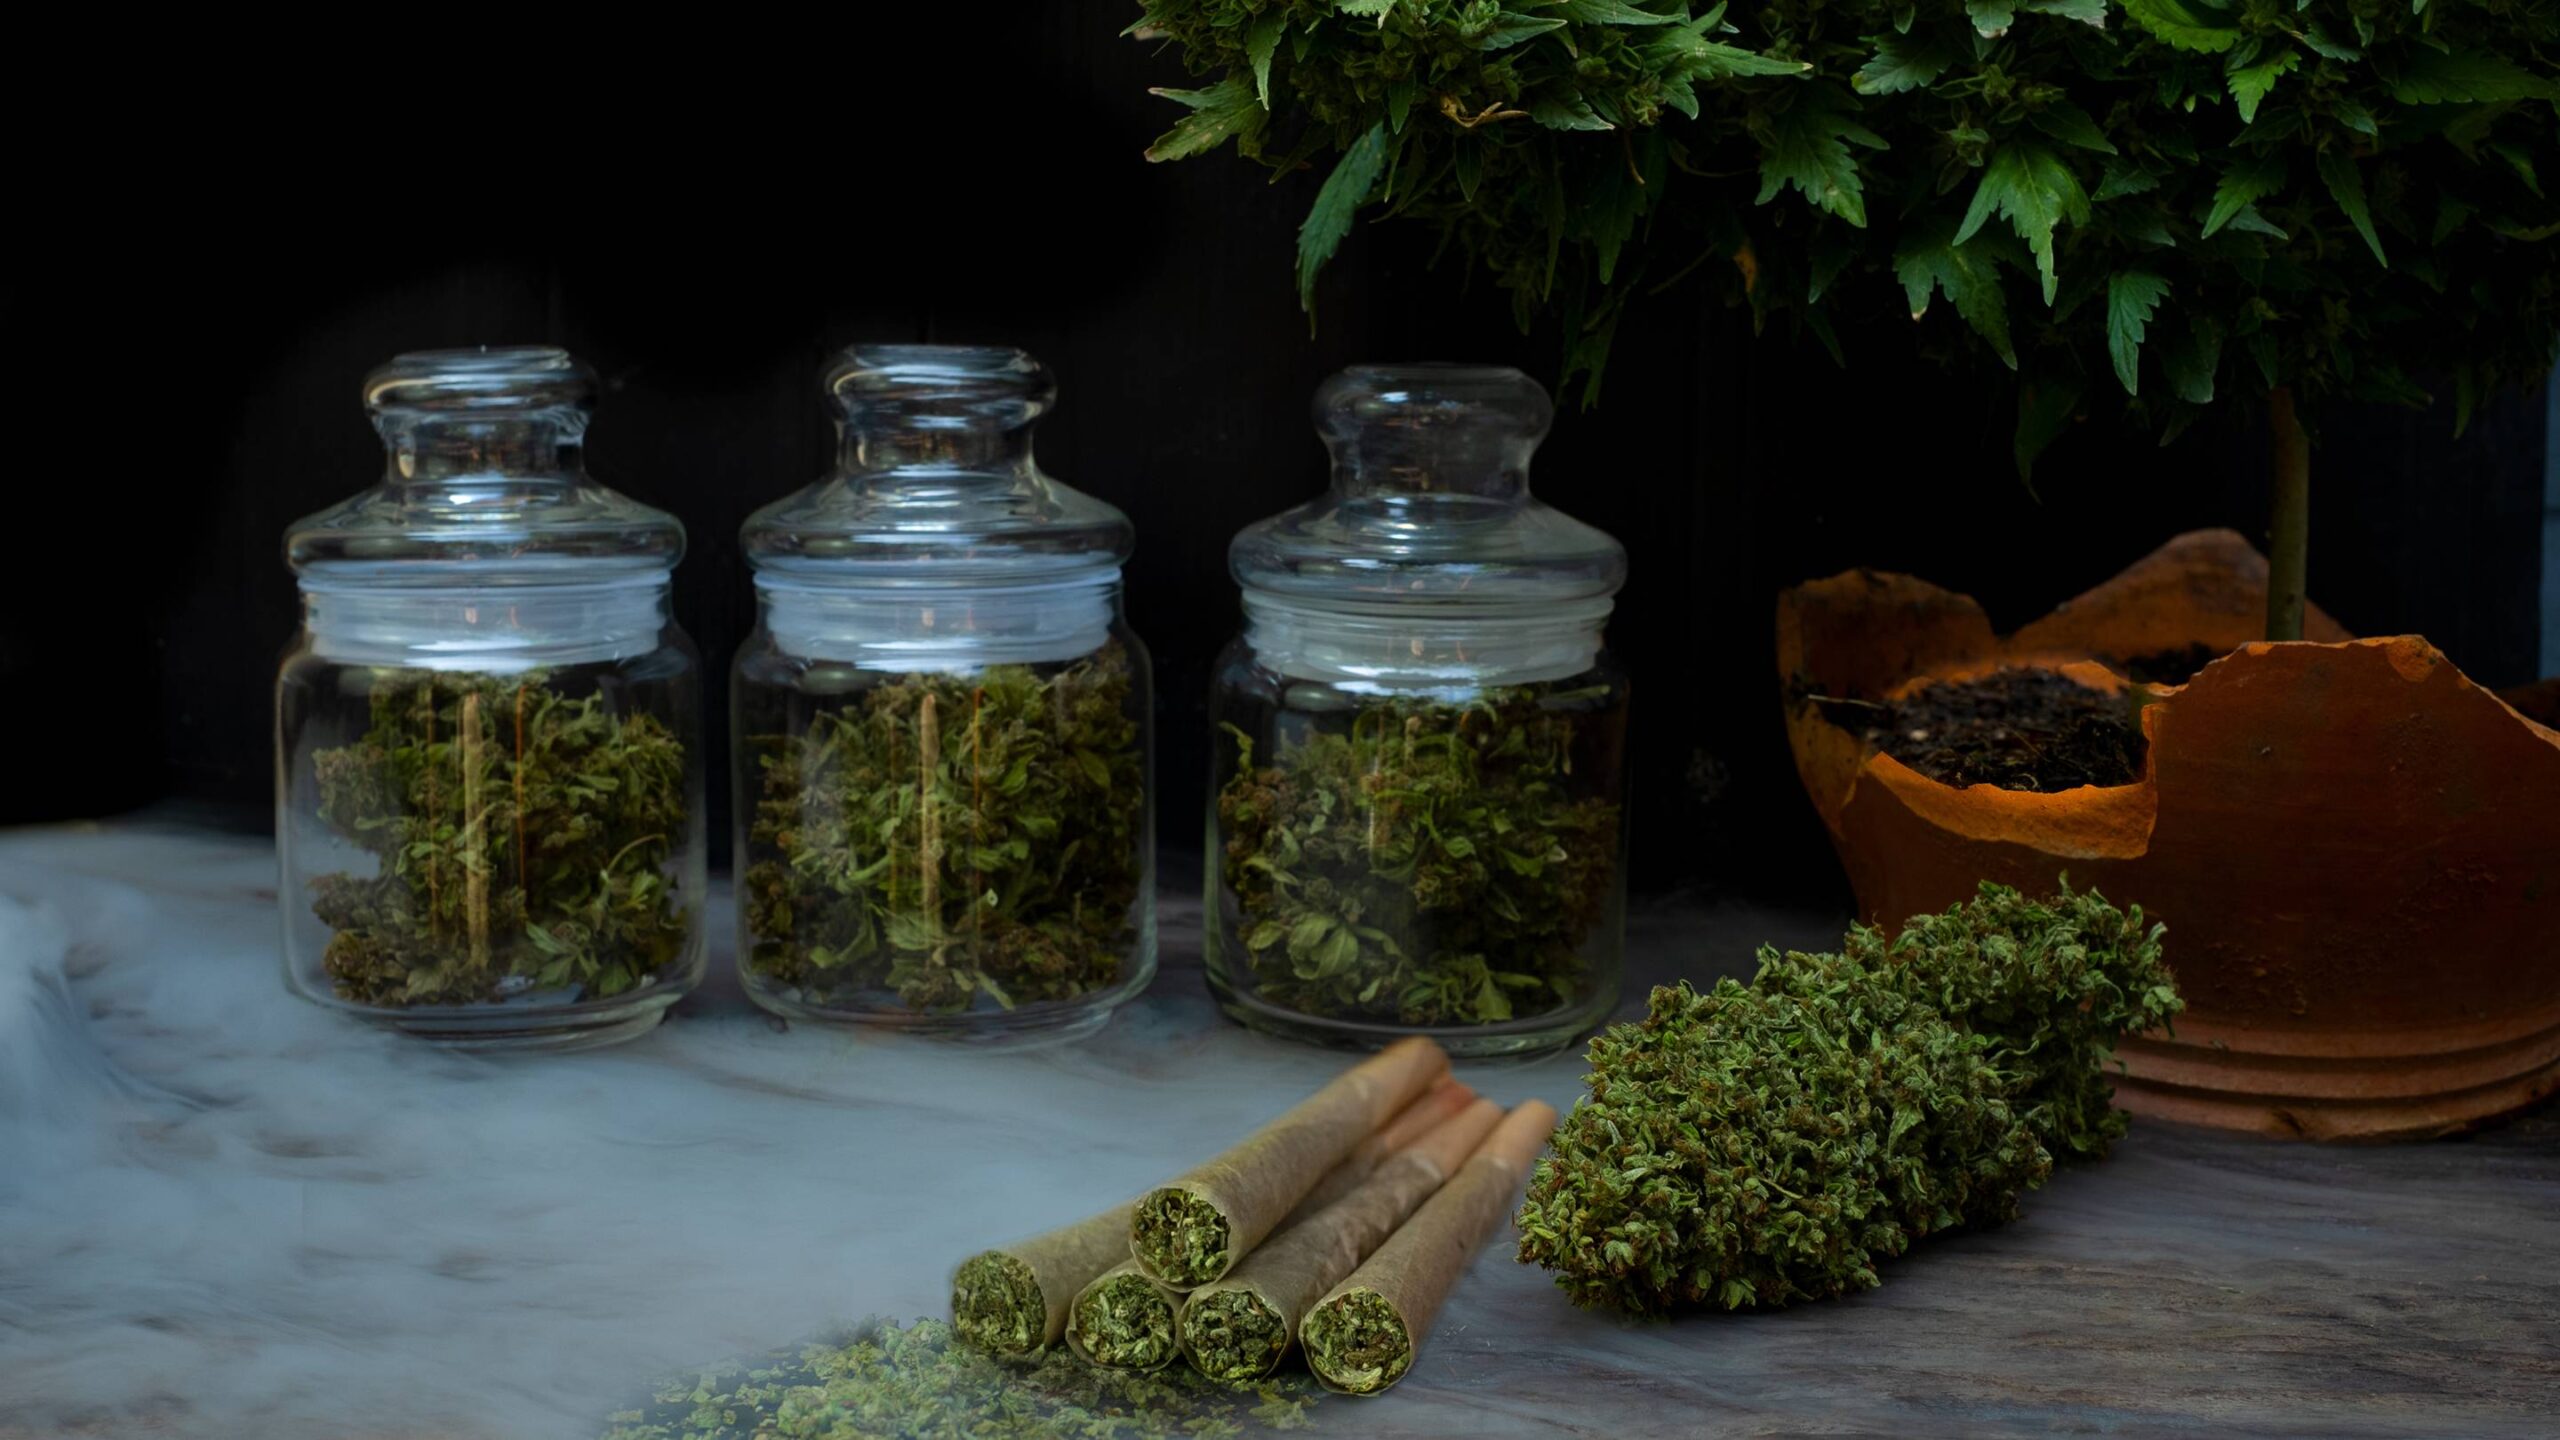
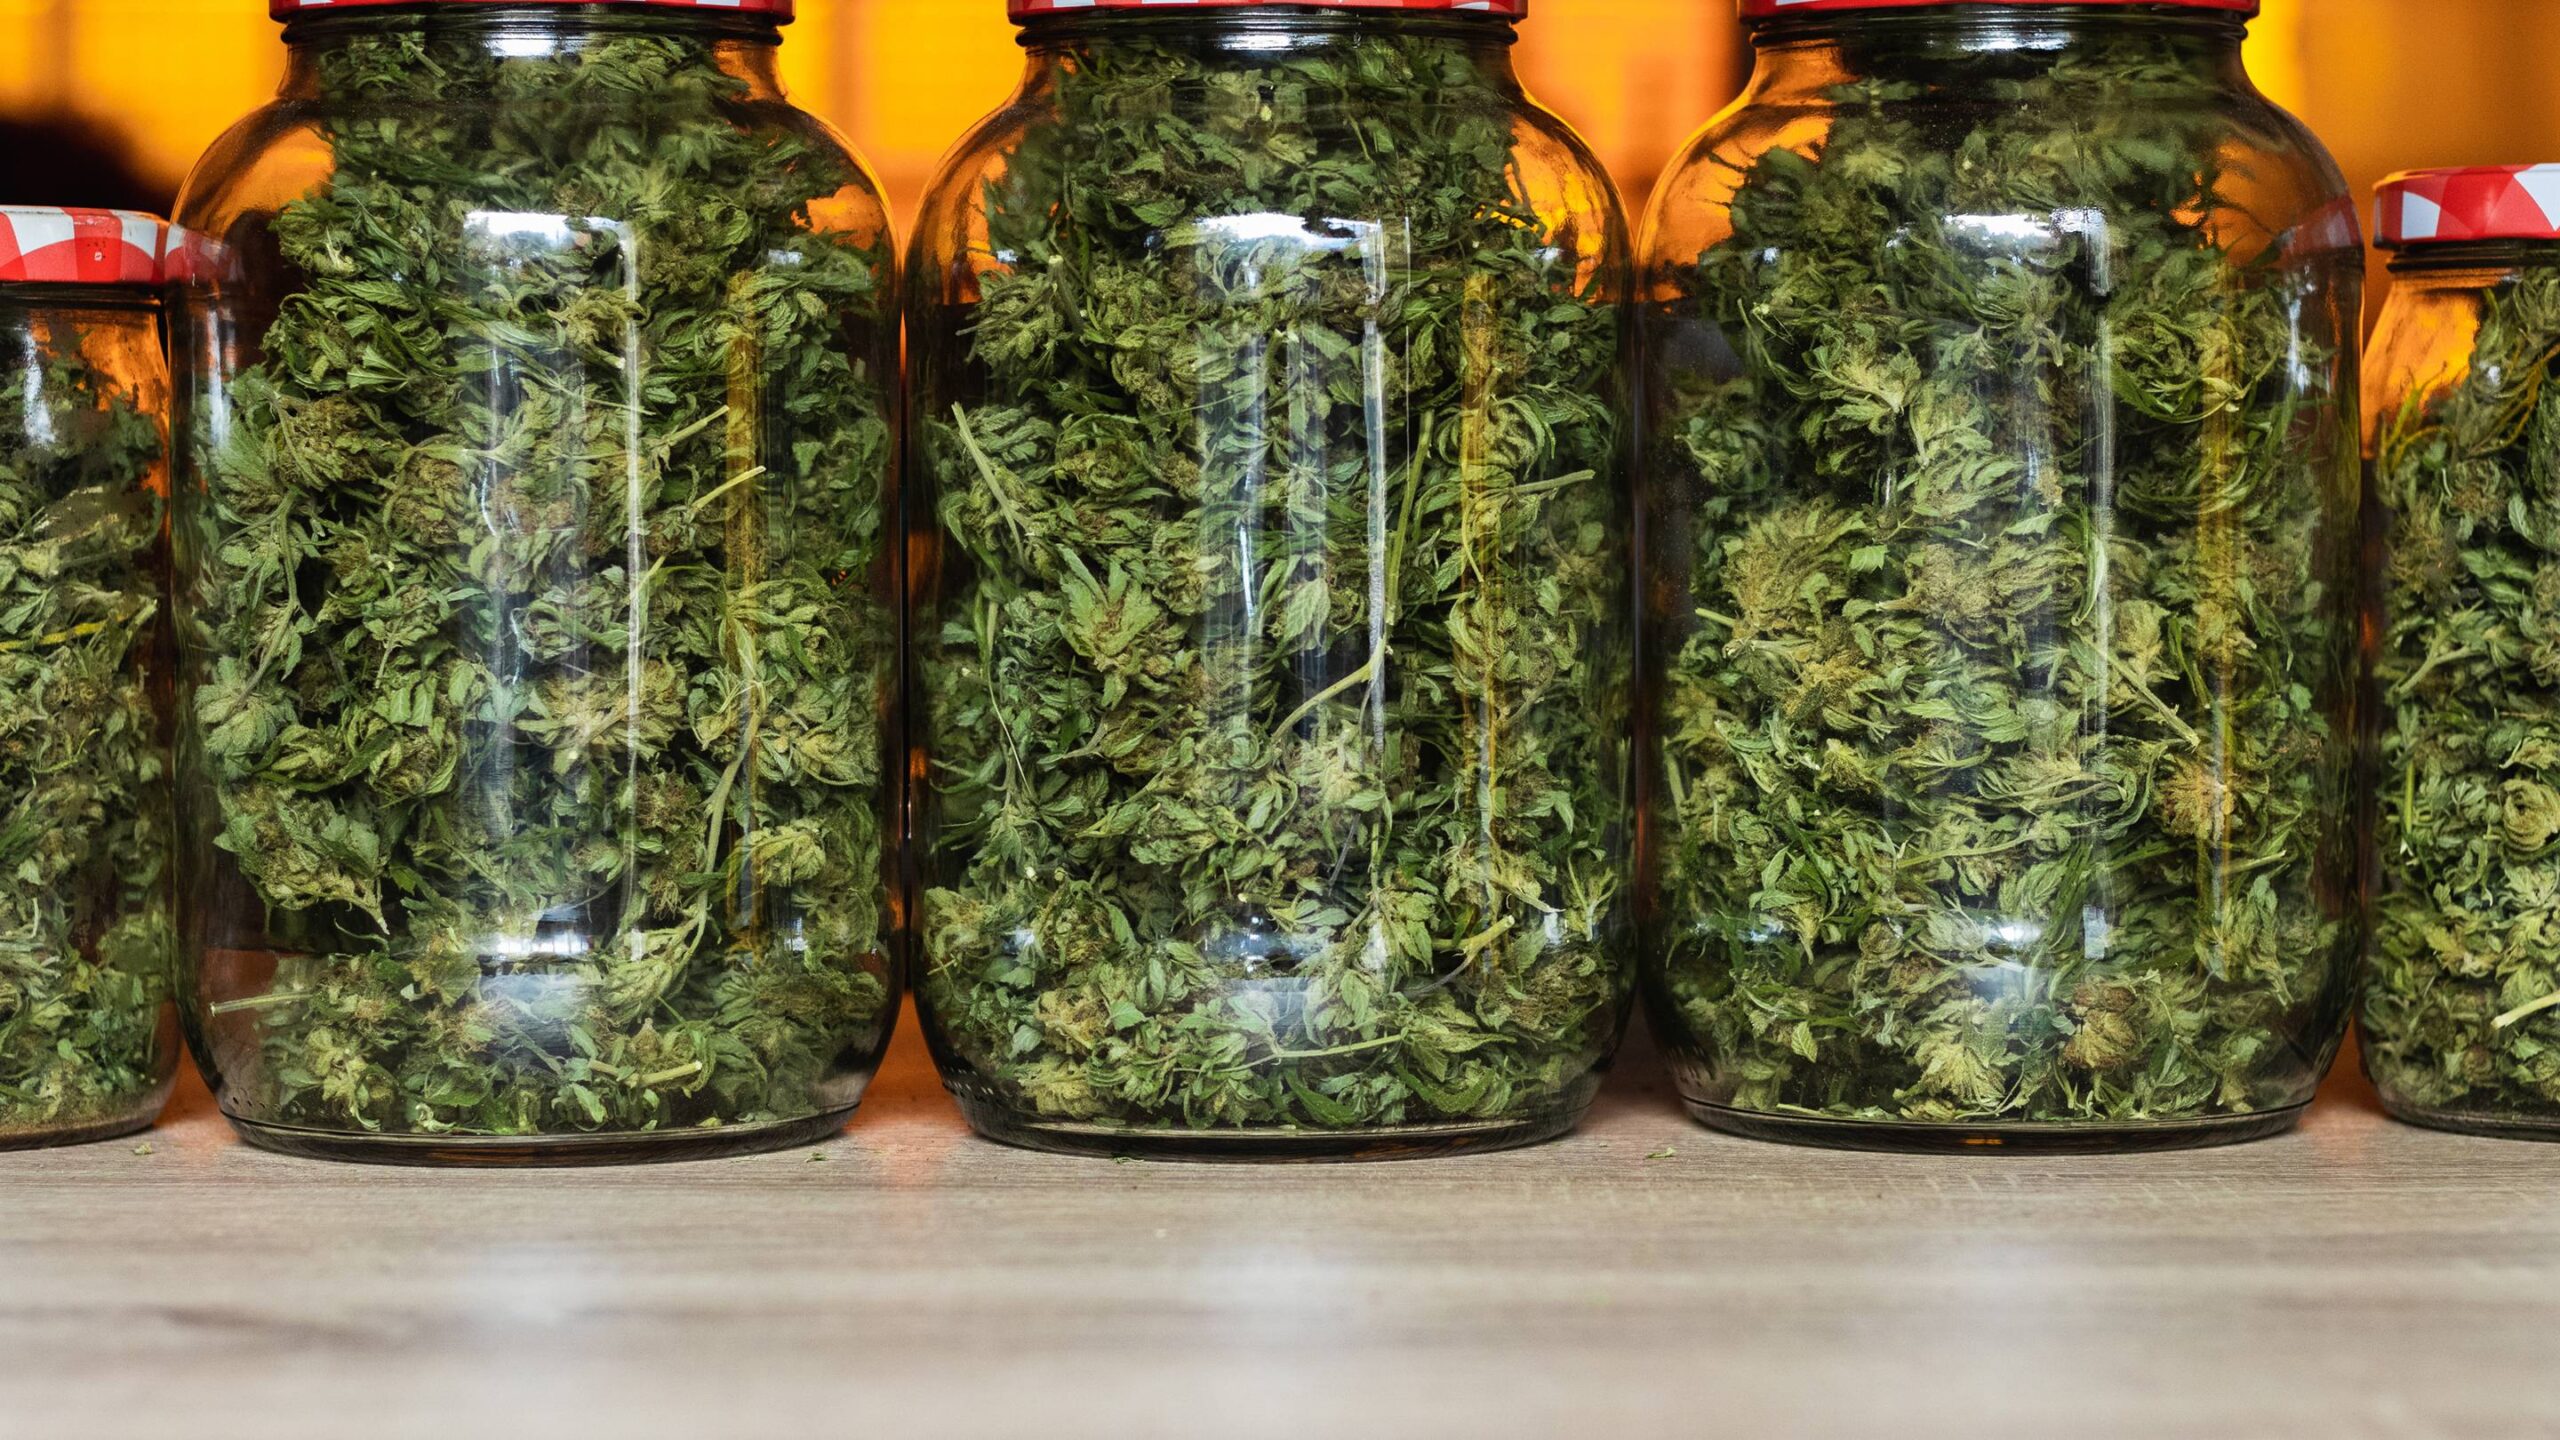
1. Jar Curing (Small-Scale Method)
This traditional method uses airtight glass jars to create a controlled environment for curing. Buds are “burped” daily by opening jars briefly to release moisture and gases for the first few weeks. While labor-intensive, it enables small growers to monitor quality and make gradual adjustments to humidity closely.
2. Room Curing (Mid- to Large-Scale)
Commercial growers often cure their buds in climate-controlled rooms designed to handle large volumes. These spaces maintain a consistent humidity level (around 60–65%) and temperature (60–70°F), while ensuring proper airflow. Room curing reduces the need for individual container management, making it more efficient for bigger harvests.
3. Automated Curing Systems
For the largest operations, automated curing systems offer precision and labor savings. These systems regulate air exchange, humidity, and temperature without manual intervention. They also enable batch tracking and data collection, which is invaluable for maintaining consistency across cycles and preventing costly mistakes.
While cannabis curing focuses on moisture control and terpene retention, food preservation techniques often share a similar goal of extending shelf life and enhancing product quality. Let us look at how curing works for cannabis-infused food products like gummies and chocolates.
Curing Methods in Food Preservation
Cannabis edibles require careful preservation to maintain their potency, texture, and flavor over time. Without proper curing or stabilization, these products can degrade rapidly, affecting their shelf life and the overall consumer experience. Here is how curing applies to different cannabis-infused foods.
1. Gummies and Soft Edibles
Gummies are prone to moisture imbalance and microbial growth if not cured properly. You need to:
- Dry gummies in humidity-controlled rooms to remove surface moisture.
- Apply starch or sugar coatings to prevent sticking and extend shelf life.
- Store in airtight, moisture-proof packaging to preserve texture and potency.
2. Chocolates and Fat-Based Edibles
Cannabis-infused chocolates require curing to prevent bloom (the crystallization of fat or sugar) and maintain cannabinoid stability.
- Temper chocolate properly during production for a stable structure.
- Cure in cool, dry environments to avoid melting or separation.
- Use vacuum-sealed or nitrogen-flushed packaging for longer shelf life.
3. Baked Goods (Cookies, Brownies)
These products have shorter shelf lives but can benefit from curing techniques to extend freshness.
- Use low-heat dehydration to remove residual moisture without degrading cannabinoids.
- Vacuum seal and refrigerate or freeze for extended storage.
- Monitor storage environments to prevent mold growth.
Whether working with edibles or flower, success depends on controlling the curing environment. Next, we will look at the ideal temperature, humidity, and airflow conditions to cure cannabis effectively.
Best Conditions for Curing Cannabis
Creating and maintaining the right environment is crucial to achieving a smooth, flavorful, and mold-free final product. Even minor deviations can lead to terpene loss or microbial growth, especially in large-scale operations. You should aim at:
- Temperature: Keep between 60–70°F (15–21°C) to slow degradation of cannabinoids and terpenes.
- Humidity: Maintain 60–65% relative humidity to allow slow moisture release without overdrying.
- Airflow: Ensure gentle, consistent air circulation to prevent stagnant zones and mold formation.
- Light: Cure in complete darkness to protect cannabinoids and terpenes from UV degradation.
- Timeframe: Allow 2–8 weeks for curing, depending on strain and bud density.
Even with ideal conditions, large-scale curing often comes with its own set of challenges. Let us explore common pitfalls that can affect quality and the steps you can take to avoid them.
Common Challenges in Cannabis Curing
Curing is where good harvests become great, or go to waste. Even seasoned growers can face issues that compromise potency, flavor, and shelf life. Here is a closer look at the most common challenges and how you can overcome them.
1. Uneven Moisture Distribution
When buds vary in size or density, they do not dry and cure at the same rate. Larger colas often retain internal moisture even after outer layers feel dry, creating pockets where mold can thrive. Smaller buds may over-dry in the same conditions, leading to brittle, harsh flowers.
Solution: Regularly rotate or gently mix buds in curing containers to redistribute moisture. Use humidity control packs to maintain a consistent RH and avoid over- or under-drying.
2. Mold and Microbial Growth
High humidity or poor airflow during curing creates a perfect environment for mold spores and bacteria. Once contamination sets in, it can spread rapidly, ruining a significant portion of your harvest and eroding profits. The risk increases in tightly packed containers or crowded curing rooms.
Solution: Keep humidity between 60–65% and ensure gentle, continuous airflow in curing spaces. Monitor with hygrometers and thermometers daily to catch changes early.
3. Loss of Terpenes and Cannabinoids
Cannabis terpenes are highly volatile and can evaporate if temperatures rise too high or curing rooms are exposed to light. Similarly, cannabinoids like THC degrade when exposed to heat, oxygen, or UV rays, leading to weaker aroma, flavor, and effects.
Solution: Cure in total darkness at a stable temperature of 60–70°F. Avoid frequent opening of containers to limit oxygen exposure, and consider vacuum-sealed environments for added protection.
4. Labor and Workflow Bottlenecks
In large-scale operations, managing multiple curing rooms or containers can overwhelm even experienced teams. Manual tracking of environmental parameters and burping schedules is time-intensive and prone to human error, leading to inconsistent results across batches.
Solution: Implement digital scheduling tools or automated systems that centralize task management and monitor curing environments across all grow spaces. This reduces oversight errors and saves labor hours.
Once you understand and address these challenges, the next step is optimizing your process for maximum potency and flavor. Let us explore proven tips for getting the most out of every cure.
Tips to Attain the Highest Potency
Achieving peak potency is not just about genetics or harvest timing—it also depends on how well you manage the curing process. Small adjustments in handling and environment can lock in cannabinoids and preserve delicate terpenes.
- Harvest at Peak Maturity: Cutting too early or late affects cannabinoid levels. You should harvest when trichomes are mostly cloudy with some amber for maximum potency.
- Dry Slowly and Evenly: A slow drying process (5–10 days) preserves more terpenes and cannabinoids compared to rapid drying.
- Maintain Stable Conditions: Keep curing rooms at 60–70°F and 60–65% RH to avoid cannabinoid degradation or mold.
- Limit Oxygen Exposure: Minimize the number of times containers are opened to reduce oxidation that breaks down THC into CBN.
- Handle Buds Gently: Overhandling can damage trichomes, which hold most cannabinoids and terpenes. Use gloves and avoid unnecessary movement.
- Consider Long Cures: Extending the cure to 6–8 weeks can enhance aroma and smoothness without significant loss of potency if conditions remain stable.
Even the best cure can be undone by poor storage practices. Small details in your curing process can make or break your final product. PlanaCan gives you a centralized system to track tasks and conditions, helping your team stay on schedule and your buds reach peak potency.
Next, we will cover how to store your cured cannabis to maintain its potency and freshness for months.
How to Store Cured Cannabis
Proper storage is the final step to preserving your hard work. Without controlled conditions, cured buds can lose potency, develop mold, or dry out, leading to a poor consumer experience and wasted product.
- Use Airtight Containers: Glass jars or vacuum-sealed bags protect against moisture and oxygen exposure.
- Keep in a Cool, Dark Place: Light and heat degrade THC and terpenes; ideal storage temperature is 60–70°F.
- Monitor Humidity Levels: Add humidity packs to maintain 58–62% RH and prevent buds from drying out or growing mold.
- Avoid Frequent Opening: Repeated exposure to air accelerates oxidation and reduces freshness.
- Store Separately by Strain: Prevent cross-contamination of aromas and maintain strain-specific quality.
From curing to storage, consistency at every step safeguards your harvest’s value. Next, let us see why accuracy is critical for achieving consistent, high-quality results.
Why Accuracy Matters in Cannabis Curing
Curing is not forgiving. Small errors in temperature, humidity, or timing can lead to significant losses in potency, flavor, and overall yield quality. For commercial operations managing multiple rooms and strains, accuracy is essential to scale success.
- Cannabinoid Potency: Stable curing environments prevent THC degradation into less potent compounds like CBN.
- Terpenes: Consistent temperature and humidity protect volatile terpenes that drive aroma and flavor.
- Mold and Spoilage: Accurate monitoring stops moisture spikes that encourage microbial growth.
- Batch Variability: Precision ensures every harvest meets the same quality standards, crucial for brand reputation.
- Supports Regulatory Compliance: Consistent processes help meet moisture content and microbial safety requirements.
Precision at this scale is hard to achieve manually, but PlanaCan gives growers the tools to plan, track, and refine curing workflows with ease. Let us see how it can simplify this critical stage.
Simplify Cannabis Curing with PlanaCan
Curing cannabis across multiple rooms, strains, and harvest cycles requires precision and coordination that is difficult to maintain manually. PlanaCan gives commercial growers the tools to streamline workflows, monitor conditions, and ensure every batch reaches its full potential.
1. Automated Work Scheduling
PlanaCan allows you to define curing workflows for different strains using customizable templates. Once set, you can schedule and assign tasks across your team with a few clicks, ensuring no step is missed during critical curing periods.
2. Interactive Calendar for Tracking
The platform’s calendar view provides a visual timeline of all curing activities. You can plan weeks or months in advance and adjust schedules on the fly as conditions or harvest timelines change.
3. Team Management Tools
Your team stays aligned with mobile app access to tasks and updates. Notes and context can be added to each step, reducing miscommunication and making it easy to coordinate across multiple curing rooms.
4. Harvest Analysis and Reporting
After curing, PlanaCan organizes all data, such as environmental conditions, timing, and workflow efficiency, into easy-to-read reports. Over time, these insights help refine your curing process and improve product quality with every harvest.
Managing curing at scale demands more than guesswork. You need systems that adapt to your operation’s size and complexity. PlanaCan offers commercial growers a way to achieve consistency, reduce errors, and protect harvest value from drying to storage.
Conclusion
Curing is one of the most crucial steps in cannabis cultivation, turning a good harvest into a great product. From preserving terpenes and cannabinoids to ensuring long-term shelf stability, every detail matters. This is especially true for commercial operations aiming for consistent quality across multiple strains and cycles.
PlanaCan was built to help commercial growers achieve this level of control with ease. Its automated scheduling, interactive calendar, and team management tools make it simple to coordinate curing tasks across rooms and staff. With harvest analysis and reporting, you can track environmental conditions and fine-tune workflows to improve your results continually.
Schedule a free call today to see how PlanaCan can optimize your curing process and help you deliver the highest quality product every time.
Frequently Asked Questions
1. How Should Cannabis Smell During Drying?
During drying, cannabis should have a fresh, grassy aroma that gradually shifts to a stronger, more recognizable strain-specific scent as chlorophyll breaks down. A musty or ammonia smell may indicate excess moisture and potential mold issues.
2. How to Add Moisture Back in if It's Overdry
Place overly dry buds in airtight containers with humidity packs (58–62% RH) or a few fresh fan leaves. Monitor daily to prevent over-humidification. This rehydration process restores flexibility without reintroducing mold risks.
3. How Long Does It Take to Cure Cannabis?
Curing typically takes 2–8 weeks, depending on bud density, strain, and environmental control. Commercial growers may extend curing up to 12 weeks for premium quality, ensuring enhanced flavor, smoother smoke, and terpene preservation.
4. What Is the Ideal Humidity for Curing Cannabis?
Maintain relative humidity between 60–65% during curing. This range prevents buds from overdrying or retaining excess moisture, reducing the risk of mold and ensuring cannabinoids and terpenes develop fully for optimal aroma and potency.
5. What Is the Ideal Temperature for Curing Cannabis?
The ideal curing temperature is 60–70°F (15–21°C). Staying within this range slows cannabinoid degradation, protects terpenes, and prevents mold growth, supporting a smooth, high-quality final product suitable for long-term storage.
6. What Is the Best Curing for Cannabis?
The best curing method balances time and environmental control. Long-term glass jar curing works well for small batches, while large-scale operations benefit from climate-controlled rooms or automated systems for consistent quality across harvests.
7. What Are the Different Methods of Drying Cannabis?
Common drying methods include hang-drying whole plants, using drying racks for trimmed buds, and employing climate-controlled rooms. Advanced setups use automated systems with airflow and dehumidification controls to manage large volumes while minimizing labor.


