
Define each part of the Template, explore their different parts, and their uses.
Table of Contents
Templates: a definition and example
Templates are the backbone for your unique cultivation schedule. They allow you to record and store any repeatable process in your cultivation. Once a Template is created, it is referenced to automate a series of Events on the Calendar.
A Template is most commonly used is to record and save every step in your cultivation's unique Harvest Schedule.
Example: you have a 70 day schedule to get from clone to flower. With your Template, you can capture every Event that is required in that unique plant treatment from day zero to day 70, enter and save it, and reference the Template every time you create a new Harvest.
By automating your schedule with a Template, you save time creating and tracking tasks, standardize work, making sure you know exactly what you're doing with each Harvest as it moves through the grow, every time.
The different parts of a Template
Each Template is broken up first into Phases, and then organized underneath that, into each Event required in each Phase. Everything is customizable, so you can break your grow process up into as many Phases and Events as you need for your specific cultivation's needs.
There's a lot more you can do with your Template. A complete list of functionality is below.
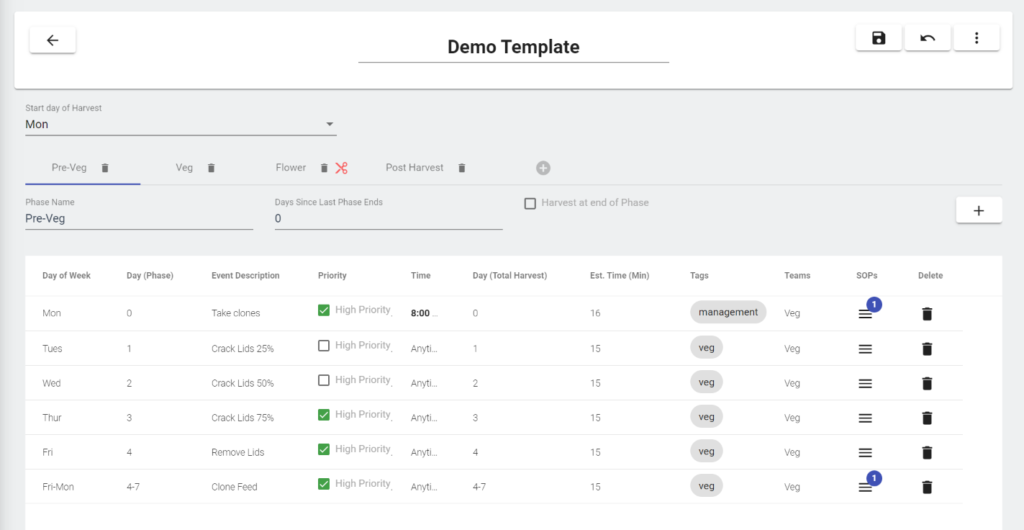
List of functionality and it's use
When you first click the Templates tab, you’ll see a list of all your Templates, how many Phases they have, total Events, and how many Harvests have been created from them.
Enter the name for your Template. You can create as many Templates as you’d like. You can also Edit the Template name.
Tip: Using easily identifiable names for different strain treatments comes in handy when actually scheduling a Harvest from the Template in the calendar.
Phases break up your Template into chunks based on changes in plant treatment.
Example: You might break up your phases into prop, clone, veg, and flower.
Tip: You can also assign users to entire Phases, so make sure to keep that in mind when creating them. We recommend breaking up a Template into no more than 5 or 6 Phases.
This dropdown lets you choose the start day of your Harvest. It anchors this day of the week, and then lets you know what day of the week subsequent Events will happen.
Tip: This is useful for cultivations that always do certain Events on certain days of the week.
If you have overlapping Phases, or a gap in days between Phases, you can add the number of days here.
A negative number overlaps the Phase with the previous one, a positive number creates a gap.
Day of Phase is where you’ll enter the day of the Harvest the task or event needs to happen.
Important: This number resets with each Phase.
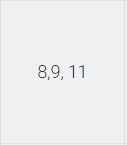
Tip: You can enter number strings if you have an event you want to repeat multiple days in a row, or individual days:
Example of a task happening on days 8, 9 and 11:
Checking this box on the current Phase you are viewing means you will Harvest at the end of this Phase.
All subsequent Phases will be categorized as “Post Harvest“. Post Harvest Phases are designed to be used for anything that happens with the plant after you cut it down.
This is where you can describe the task that needs to be done.
Tip: Keep these descriptions short, so they’re easier to read on the calendar. You can add additional information in the note of the task (see below)
Have something that’s extremely important? Add a high priority marker to it.
It’ll appear at the top of the daily schedule, and include an exclamation point as well to make sure everyone knows it can’t be missed.
Choose a time that the task needs to be done, or mark as anytime.
If a task has a time, it will appear in the calendar above the anytime tasks, but below high priority tasks.
Enter an estimated time an Event will take.
Estimated time is shown on each Event popup in the Calendar if it is filled out.
You can also require that Time Taken be filled out. On the Event, users will not be able to complete the Event without filling out the Time Taken on that Event.
This number tracks the absolute day in Harvest of a specific task or event.
It differs from the Day of Phase, in that it does not reset with every Phase.
Tags allow you to customize different tasks with a Tag. The tag can then be used to Mass Assign a User, or group of Users to every task that contains the Tag.
This is very useful if you have a bigger grow.
Example: Create a Tag that is associated with a Team. Assign that Tag to every task in the template you’d like the team to be working on. Once your Harvest is scheduled on the calendar, you can assign the team to every task that’s tagged with just a few clicks.
You can assign a Team to an Event in a Template, then when a Harvest is created, the Team will already be assigned to the Event, without having to assign them in the Calendar.
Remember, Teams must be set up first under the Users and Teams tab.
SOP's (Cloud documents, Attachements, and Notes)
Want to attach specific information to a certain Event? PlanaCan enables you to attach, link, or add notes to any Event.
Tip: Use cloud attachments for new hires, so they can view videos, or guides on how to do a certain task.
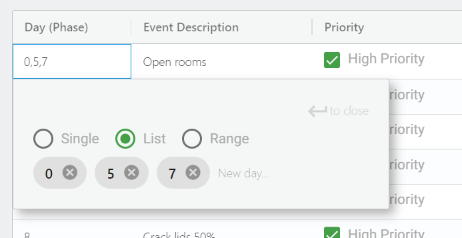
Repeating Template Events - single, list, and range
When adding an event under Day (Phase), or Day (Total Harvest), you have a choice to choose whether you want the single Template Event to happen once, on specific non-concurrent days, or multiple times, over a range of concurrent days.
- Single Event: The default setting for any Event that's being added to a Template. The Event/Task will happen on the day entered, and not repeat.
- List of Events: Choose which days in the phase this Event will happen. In other words, if you have an Event that needs to happen on days 0, 5, and 7, for instance, use this option.
- Range of Events: For Events that will happen each day, over a range of days.
Copying, downloading and uploading Templates
If you're an MSO, or have multiple cultivations, you can export your Template to a .csv, and email it to another location, reupload it, and use the Template again.
Additionally, if you'd like to A/B test a plant treatment, you can copy an existing Template, update with your desired changes, then test it against an existing Template.
Template to Harvest sync
As you change, and update a Template (read, your unique plant treatment), you can also update the active Harvests on the Calendar linked to the Template. It is your choice whether you want to reflect the changes you've made in the Template, and reflect them on the Calendar.
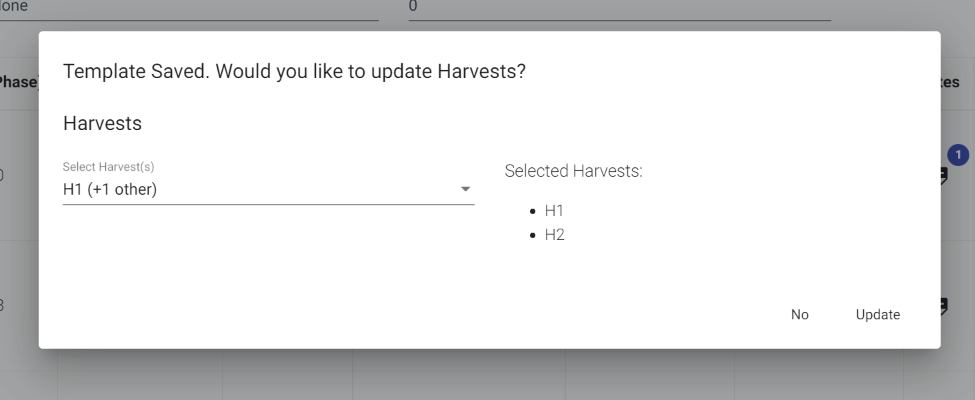
Important! If you do choose to update a Harvest tied to a Template, only events that have not happened yet will be updated for that Harvest.
We do this so your history of what actually happened with each Harvest stays accurate, with no new Events that never happened added in the past.
The Takeaway
Templates are the backbone for every Harvest scheduled in your grow. Making sure you take the time to create a well thought out Template, with every step accounted for, is essential to using the platform effectively.


