
Understand basic terminology, create your first template, schedule a harvest, and assign users.
Table of Contents
This article is for the first time user that would like to design their first Template, create their first Harvest, and start scheduling. For a short minute tutorial, please watch the video below.
How it works: the Template to Harvest Connection
PlanaCan empowers you to qualify and automate each step of your unique grow process through creation and use of customizable Templates. Once a Template is built, it is referenced to create each Harvest schedule on the Calendar.
Templates
Templates are where you record and store your unique "grow bible". For every Template, you can define each individual event or step required to get a group of plants from clone to harvest, and beyond.
For each step in the Template, you can also define important information for each step - such as what type of feed or spray you'll use, the time the event should be done, or a link to cloud documents and attachments for SOP's.
A screenshot of Template screen is below, built out with each Phase, then every Event specified for those Phases:
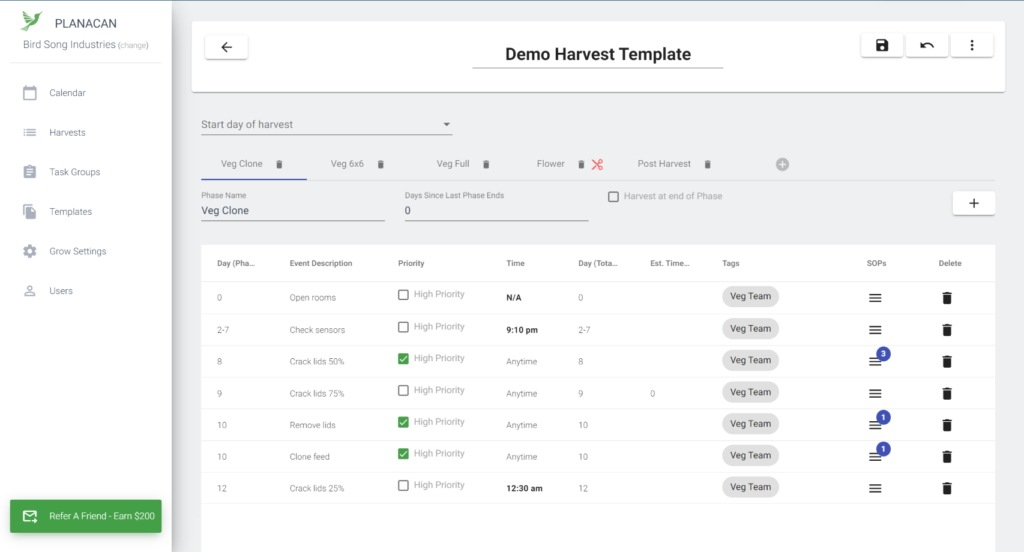
An example of how a Template is commonly used: your Harvest cycle is 70 days long. Your Template should include every step required in those 70 days, from day 1 to day 70, from clone to Harvest, broken up into their respective Phases.
If you want a more in depth walkthrough on Templates, click here.
How to create a Harvest using a Template
Your account comes with a pre-loaded demo Template. We'll use that demo Template in this walkthrough to show you how to schedule your first Harvest.
On the Calendar tab, click the menu button in the upper right, and choose "Add Harvest":

From there, you can choose which Template to reference, add the name of the Harvest, and the start date. You can also choose a color for the Harvest:
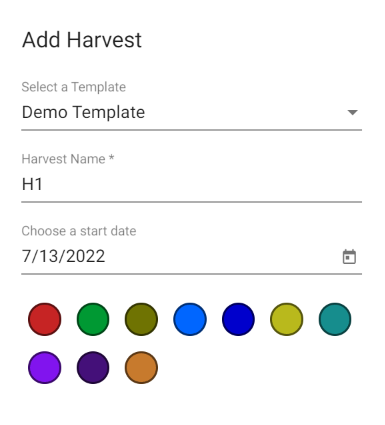
Once you click save, each step from the Template, starting from day zero, to the last day specified, will be populated onto the Calendar as a Harvest, beginning from the start date chosen.
Congratulations, you now have your first Harvest scheduled!
Assigning Users to a Harvest
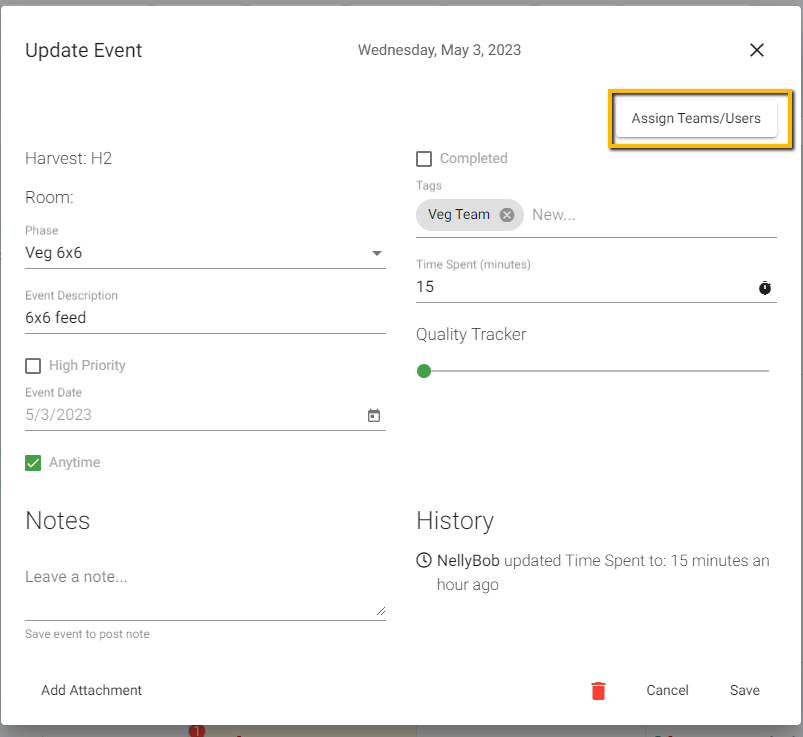
Now that your Harvest is scheduled, you can add different Users and Teams to each event or task associated with the Harvest. If you click on a event, you'll see the event pop-up below: The event pop-up already includes all the information that was specified directly from the Template. The last step is to assign the user who should complete the Event.
Fore more specifics on Events and how they work, click here.
In the upper right hand corner, choose which user to assign. It's important to note you can assign multiple users to each task. You can also use our Mass Assign feature. Mass Assign is great for larger grows, with many growers. For more information on Mass Assign, click here
Takeaways
Everything starts with building a good Template of your specific grow schedule. Spending time creating a well thought out, and thorough Template is essential, because every Harvest that gets scheduled onto the calendar will contain one of your Templates information.
This article is meant as a quick walkthrough to get you scheduling. If you want to dive deeper on anything else, head back to our main FAQ page to explore in depth different parts of the software.


