Search for, and read through walkthroughs for different parts of the application. Understand functionality, and learn how to get the most out of PlanaCan.
Topics are grouped by page. A full list of functionality is also included with links to each walkthrough they relate to.
[ivory-search id="3941" title="Search FAQ"]
Documents are ordered by the area of the application each topic is associated with. A complete list of functionality is also included below.
Templates
Harvests
Calendar
Settings
Calendar
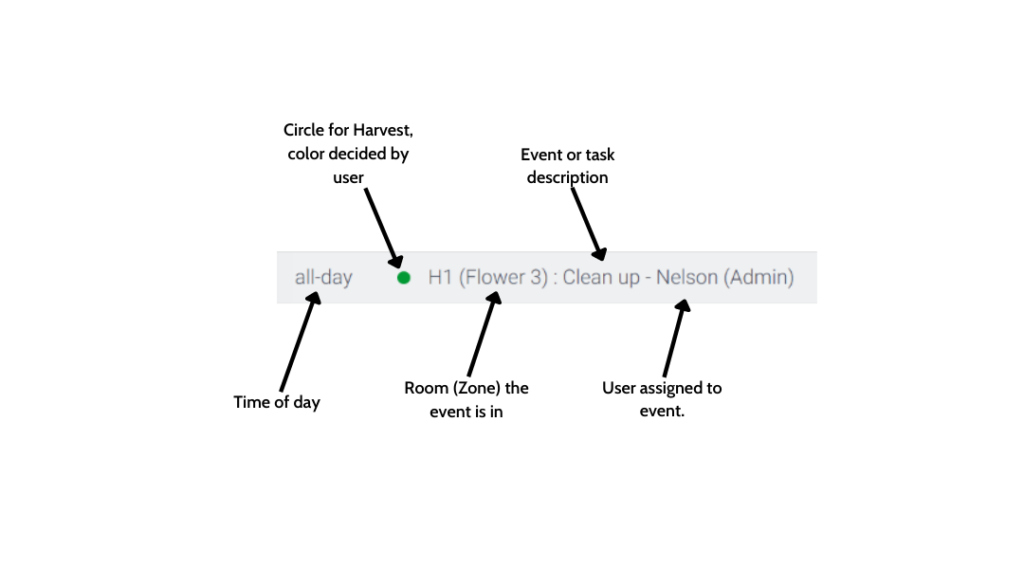
A Harvest Event is any Event that appears on the Calendar that’s specifically tied to a Harvest. Harvest Events also appear in the Harvest Detail list of Events. They are noted on the Calendar by a circular badge.
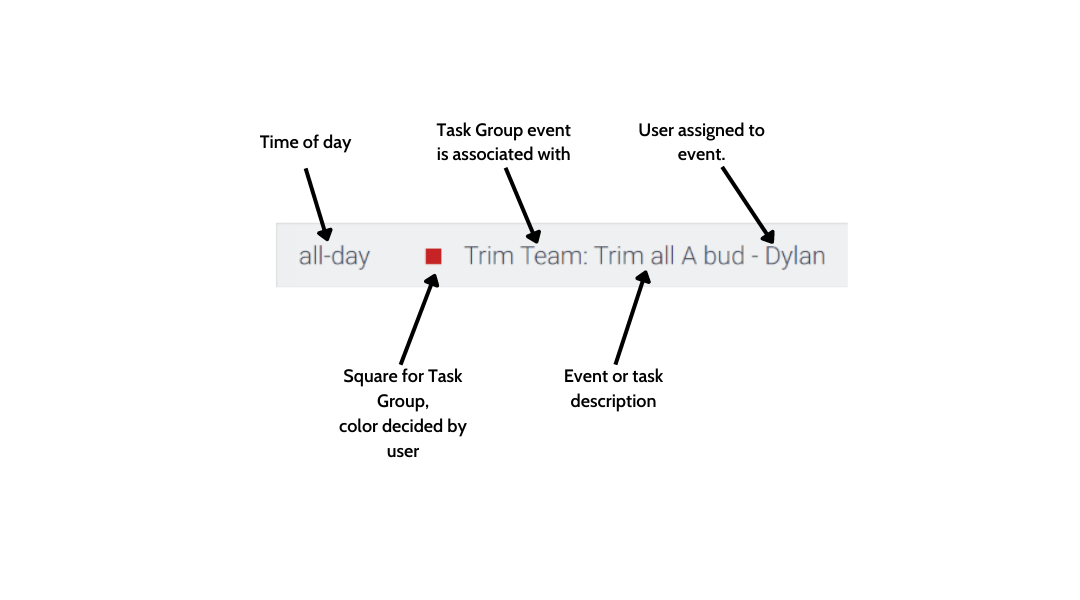
Task Group Events are any Events that are done grow wide, and are not tied to just one Harvest. Think of an IPM spray, room clean, or a managers meeting. Task Group Events to do not appear in the Harvest Detail page. They have their own Task Groups Tab.
Monthly, Weekly, and Dail Views
You can switch between multiple views of your schedule on the Calendar. Within the weekly view, you can also toggle back and forth between a list view, and weekly Calendar view.
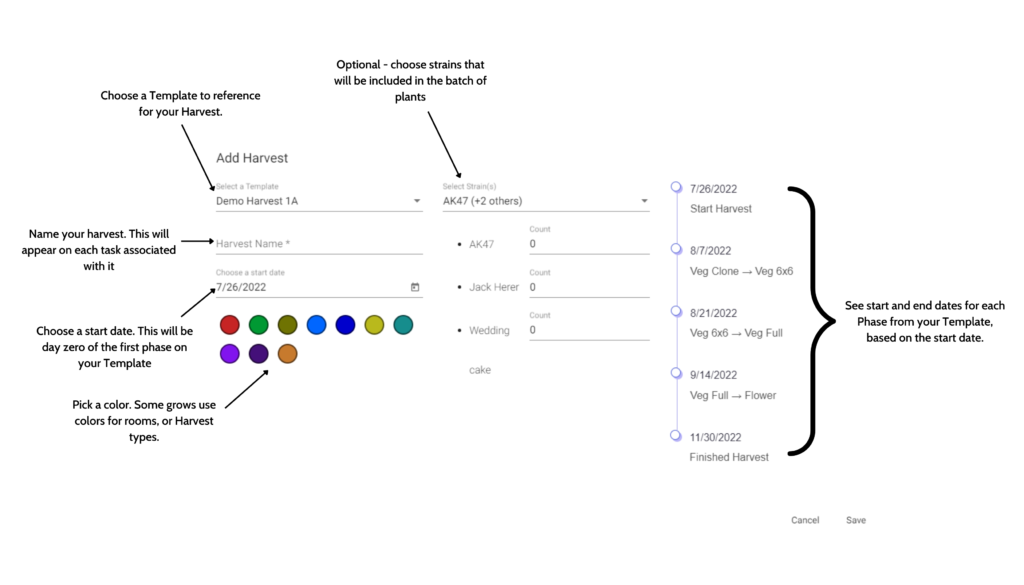
Adding a Harvest to your schedule means you are taking all the information from your Template, and scheduling it with a start date on the Calendar.
You can also choose which clones you will be pulling with each Batch. This is optional.
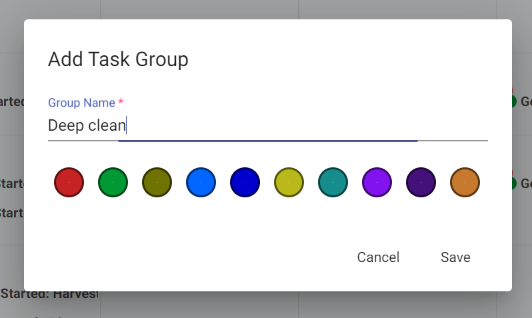
Adding a Task Group means adding a group of Tasks that aren’t associated with a specific Harvest, under a Label. When you create a new Task Group, you are creating that label to then create Events underneath.
Examples of a Task Group might be an IPM spray, room clean, or Managers Meeting. Remember, Task Groups Events are not included in the Harvest List of Events.
Mass Assign is useful for grows where Technicians usually handle certain Events within a Harvest. It’s also useful for larger grows, with many employees.
With Mass Assign, you can get multiple Users, and Teams, assigned to Events within multiple Phases/Date Ranges/Tags, within multiple Harvests.
For more information on Tags and how they work with Mass Assign, click here.
If you need to move the Events associated with an entire Harvest, or multiple Harvests, you can shift them with Shift Harvest.
You can choose how many of your Harvests you’d like to shift, how many days, and on which date.
An example of when to use Shift Harvest might be when you have a batch of plants that stays in veg for an extra week. In this case, that extra week affects the schedules for other Harvests. To make sure you keep your schedule accurate, you can move every Event, in multiple Harvests, to allow for the extra week in veg.
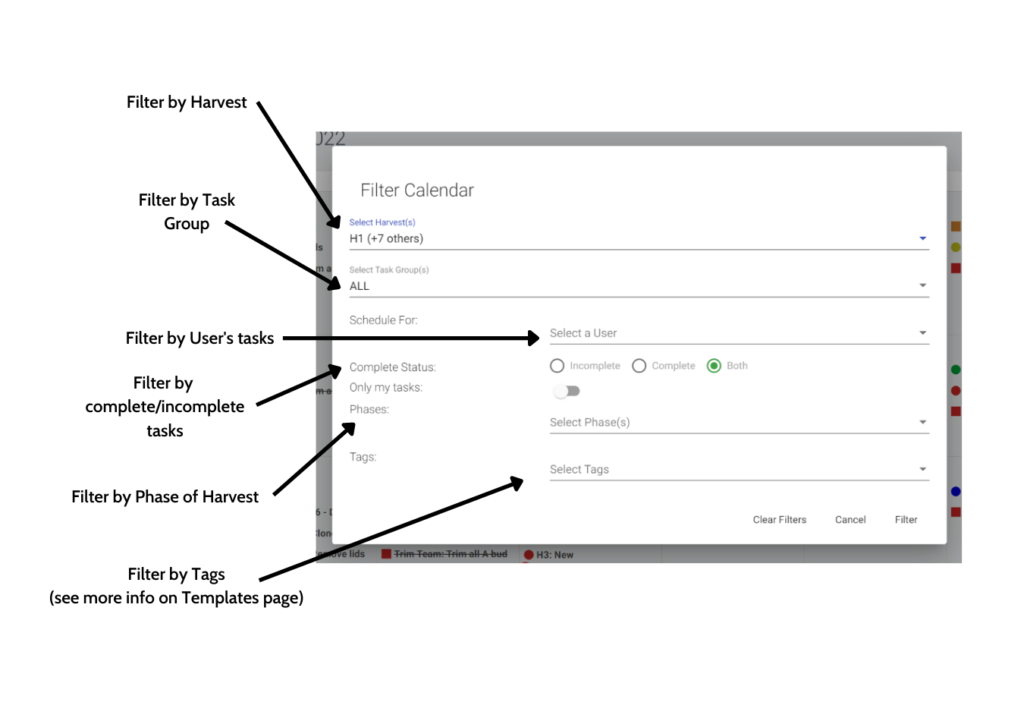
Filtering helps you focus on what you want to see, and not what you don’t. If you’ve just created a new Harvest, and want to assign work, you can filter out all other Harvests. You can do the same for a User.
You can Drag and Drop Events from one day to the next in the monthly, and weekly Calendar views. This is useful if you miss something one day, and want to make sure you get to it the next day.
You cannot Drag and Drop in the list views on the Calendar.
Task Groups
View each of your Task Groups, the start date and end dates of them, and also the total number of Events associated with them.
Once clicked, view individual Events associated with a Task Group. Here you can also edit the name of each Task Group.
Template List Lorem ipsum dolor sit amet, consectetur adipiscing elit. Ut elit tellus, luctus nec ullamcorper mattis, pulvinar dapibus leo. Template Name Lorem ipsum dolor sit amet, consectetur adipiscing elit. Ut elit tellus, luctus nec ullamcorper mattis, pulvinar dapibus leo. Phases Toggle Content Days Since Last Phase Ends Toggle Content
Grow Settings
Enter each of the Strains that will be used in your cultivation. Once entered and saved, for each Harvest you can choose which Strains you’d like to run with each Harvest.
Create and save each Zone in your Cultivation. Often Zones represent Rooms in your grow.
Remember, you can have as many levels of organization as you want within your Zones.
Most common Zone identifiers are Room, and underneath that, Table.
Company Settings
Edit your cultivation name as it appears in the upper left corner of your license.
Edit the Time Zone your cultivation is in.
Create automated Custom Push Notifications for your growers, notifying them how many Events they have that day, etc.
The Phone App
View your schedule on the fly. See everything that’s been added from the Web App, on your phone as you move through the grow.
Add new Events from your phone.
Helpful when you are in a room, or think of something when you’re not at a computer.
Assign Users to Events from your phone.
Harvests
View start dates, Harvest dates, and absolute end dates for each Harvest in your grow.
View an interactive timeline that shows each of your Harvests in relation to each other.
Export your Harvest list to an excel or other spreadsheet document
After clicking into a specific Harvest, you can edit the name at the top.
Shift Harvest Toggle Content Backfill Template
Create a new Template from a successful Harvest, with all of it’s individual Events as they happened.
The dashboard, directly underneath the Harvest name, gives you the important dates of the Harvest, as well as the amount of total Events completed.
View the timeline of a scheduled Harvest, and each Phase within it, and also a ticker for the current day.
Complete list of Events for that Harvest. Anything you do on the Calendar, you can also do within an individual Harvest’s Events.
Add Zones to each Harvest, as well as Strain Counts. Track your plants physically as they move through the grow.
Templates
After clicking on the Templates tab, the first thing you’ll see is a list of your active Templates, how many Phases, and Events are associated with them, and how many Harvests have been created from each Template.
When adding a Template from the Template List screen, you can choose the name of the Template.
After creating the Template, once you click into the Detail, you can rename the Template.
Phases break up your Template into chunks based on changes in plant treatment.
Example: You might break up your Phases into prop, clone, veg, and flower.
You can also choose when to cut down your plants at the end of a Phase. Every additional Phase added after the “end of harvest” will show up as a post Harvest Phase. This is useful for automating everything your team needs to do after the plant is cut down.
Tip: You can also assign users to entire Phases, so make sure to keep that in mind when creating them. We recommend breaking up a Template into no more than 5 or 6 Phases.
If you have overlapping Phases, or a gap in days between Phases, you can add the number of days here.
Important: A negative number overlaps the Phase with the previous one, a positive number creates a gap.
Day of Phase is where you’ll enter the day of the Harvest the Event should happen on. Depending on the number you enter, the Event will reorder in the list.
Important: The Day of Phase number resets with each Phase. Each Phase starts on day one, or day zero if you want the first Event of the Phase to start on the same day as the last event of the previous Phase.
Tip: You have the option to repeat Template Events in a non-concurrent list, or a range. This is useful for when you have the same Event required multiple days within a Phase.
You can choose which day of the week to anchor the first day of your Harvest to.
This is useful to see which day of the week different Events fall on in the Harvest.
Example: If you always start a new batch of plants on a Monday, you can enter it as the start day. Once entered, every subsequent day will be assigned a day of the week based off your entry.
Describe the Event that needs to be done.
Tip: Keep these descriptions short, so they’re easier to read on the calendar. You can add additional information in the note on the task (see below)
Have something that’s extremely important? Add a High Priority marker to it.
It’ll appear at the top of the daily schedule, and include an exclamation point as well to make sure everyone knows the Event can’t be missed.
Choose a Time that the Event needs to be done, or mark as anytime.
If a Event has a time, it will appear in the calendar above an anytime Event, but below high priority Events.
This number tracks the absolute day in Harvest the Event will take place. You can also edit this number, as opposed to the Day of Phase.
The Day of Total Harvest number does not reset with each Phase.
Want to attach specific information to a certain task? PlanaCan interacts with any linkable cloud service such as SharePoint, Google Drive, and Microsoft cloud. You can also add any URL you’d like.
Tip: Use cloud attachments for new hires, so they can view videos, or guides on how to do a certain task.
Notes are used for simple instructions. Have a certain feed that is used with a task? Or any other context you’d like to include? Write a note in the Template, and it will be included in the task when it is populated onto the Calendar.
Tags allow you to customize different tasks with a Tag. The tag can then be used to Mass Assign a User, or group of Users to every task that contains the Tag.
This is very useful if you have a bigger grow.
Example: Create a Tag that is associated with a Team. Assign that Tag to every task in the template you’d like the team to be working on. Once your Harvest is scheduled on the calendar, you can assign the team to every task that’s tagged with just a few clicks.
Users and Teams
See the name, email, and role of each User in the cultivation.
There are three different Role types in PlanaCan. Each have their own permissions.
Please head to the Users page to read specifics.
Once a User is selected, you can edit their Name as it appears in the application, and also their email.
Disable, Enable, and Delete User
Disable a User, but keep their info in your database. You can also Enable them as the inverse of this.
Deleting a User removes them from all Events, and deletes all information associated with their account.
Add a new User. They will receive an email invite asking them to create their own login.
All Users added will default to Standard User role.
If you have multiple cultivations, you can add Users between multiple Calendars.
This is great for management, and for employees that work at more than one grow.
You can export your User List to a .csv. Names, emails, and Roles are exported.
View each existing Team in your cultivation, and also create new Teams.
Remember, when a Team is created, they can then be assigned through “Mass Assign” to multiple Events, for multiple Harvest, with just a few clicks.